Low key lighting is what how we call the lighting method, where the photographed subject is very much described by its edges in a very contrasted way.You’ll basically need only one main=key light to get that effect, while adding a reflector might add some light into the shadows.
How to take the low key photograph?
The basic low key drill will go like this:
- Place the model.
- Set the main light to her left.
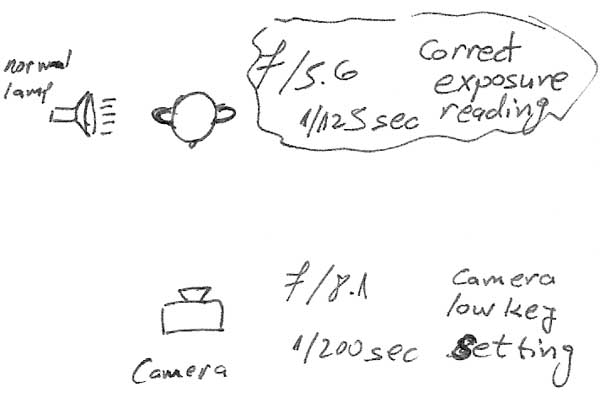
- Take a light center weight reading from the model, lets say that the reading shows f/5.6 1/125th sec.
- Set your camera to manual mode and set the exposure about 2 – 2.5 stops lower than the actual reading.
- Take the low key picture!

More tips for your low key photography:
- If using a soft light (like a lamp with a big light ratio, or an umbrella with a strobe) try not to position your model backed to close to a close wall, that will reduce the “low key” effect, as the low key effect is much about dark on dark.
- Explore your low keys by moving the main light closer to the model will get you more harsh shadows and contrast look while moving it back will get you softer shadows.
- It will be a good idea to get a reflector into your low key setup. It will add some more edges into the frame.
- As this type of low key using just one light source you could get a reflector on the light’s opposite side and get some edge to the photograph.
- If you photograph products or still objects, it will be a very good idea to put the light behind the object.Move the light around it to see the changes.