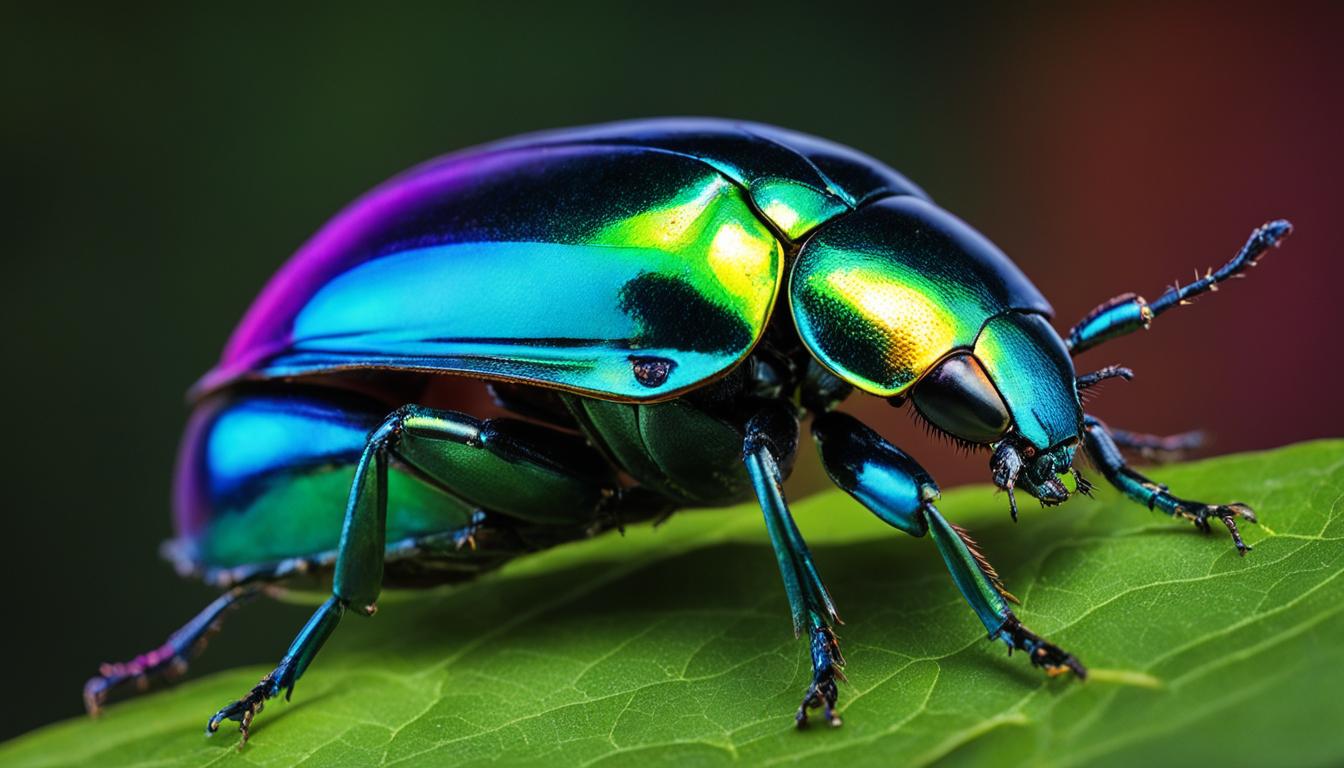
Insect photography is a captivating art form that allows photographers to capture the intricate beauty of small creatures. It offers a unique perspective and reveals the hidden details that often go unnoticed by the naked eye. To master the art of insect photography, it is essential to understand the importance of lighting and composition.
The right lighting can make or break a photograph. It can enhance the textures, colors, and details of an insect, creating a visually stunning image. Understanding how different lighting conditions affect the subject is crucial for capturing the essence of these tiny creatures. Whether it’s utilizing natural light, using diffusers, or experimenting with artificial lighting, finding the right balance is key.
Composition is another vital aspect of insect photography. It involves arranging the elements within the frame to create an engaging and visually pleasing image. Paying attention to the background, foreground, and the insect’s position within the frame can make a significant difference in the final result. Experimenting with different angles, perspectives, and framing techniques can lead to striking compositions that showcase the beauty and uniqueness of each insect.
By mastering the interplay between lighting and composition, photographers can create stunning insect photographs that captivate viewers and bring the tiny world of insects to life.
Key Takeaways:
- Lighting plays a crucial role in insect photography, enhancing textures, colors, and details.
- Understanding how different lighting conditions affect the subject is essential for capturing stunning images.
- Composition involves arranging elements within the frame to create visually pleasing and engaging images.
- Paying attention to the background, foreground, and the insect’s position can significantly impact the final result.
- Experimenting with angles, perspectives, and framing techniques can lead to striking compositions.
Shooting Down on a Subject
Shooting down on a subject is a popular macro shooting angle that provides photographers with the opportunity to capture stunning images of insects up close. This angle allows for greater flexibility in subject framing and emphasizes the intricate details of the insect’s body.
However, shooting down on a subject does come with its own set of challenges. Out-of-focus antennae and distracting shadows can hamper the overall quality of the photo. To overcome these obstacles, photographers need to find the right combination of aperture and shutter speed to achieve the desired depth-of-field and motion detail in the image.
When shooting down on a subject, it’s essential to position the camera at the right angle to avoid capturing unwanted elements in the frame. Taking the time to carefully compose the shot and adjust the camera settings can make a significant difference in the final result.
If done correctly, shooting down on a subject can result in visually impactful and captivating images. The unique perspective offers viewers a fresh look at these fascinating creatures and allows them to appreciate the intricate beauty of insects.
Subject at Eye Level
Photographing a subject insect at eye level creates a more intimate feeling in the image. It allows the viewer to connect with the insect on a personal level, as if they are seeing the world from the insect’s perspective. This technique evokes a sense of empathy and curiosity, drawing the viewer into the intricate details of the insect’s world.
When photographing at eye level, the prominence of antennae is reduced compared to shooting down on a subject. This improves the overall aesthetics of the image, providing a clearer view of the insect’s features and reducing distractions. It allows for greater control over composition, making it easier to frame the subject in a visually pleasing manner.
However, shooting at eye level can still present challenges, especially when using a head-on perspective. The positioning of the insect’s antennae can cause issues, potentially obstructing important parts of the composition or appearing distorted. To overcome this, careful positioning and composition are essential to capture compelling images at eye level.
Quick Tips for Photographing at Eye Level:
- Get down to the insect’s level to capture a more intimate and engaging perspective.
- Experiment with different angles and compositions to find the most visually pleasing result.
- Pay attention to the positioning of the insect’s antennae to prevent them from obstructing important details in the image.
- Consider using a shallow depth of field to isolate the subject and create a pleasing background blur.

Shooting up at a Subject
Shooting up at a subject is a powerful technique in macro photography that adds drama and depth to your images. By positioning your camera’s lens underneath the subject, you can capture a unique and visually striking perspective. This low camera angle creates a sense of grandeur and emphasizes the subject’s size and presence.
This dramatic angle is particularly effective when photographing insects, as it magnifies their intricate details and showcases their natural beauty. Whether you’re capturing the delicate wings of a butterfly or the textured exoskeleton of a beetle, shooting up at a subject gives your photos a captivating and awe-inspiring quality.

However, shooting up at a subject comes with its challenges. Composing the shot from the rear screen of the camera can be tricky, requiring careful positioning and precise framing. Additionally, this angle may limit the amount of the insect’s body captured in the image, but it focuses attention on the key features that make the subject stand out.
To effectively execute this technique, planning and quick action are crucial. You need to anticipate the insect’s movements and be ready to capture the perfect moment. Patience and persistence will pay off in creating striking images from this unique perspective.
Understanding Macro Photography
Macro photography is a fascinating genre that allows photographers to capture the intricate details of small objects in larger-than-life size. When it comes to macro photography, magnification and minimum focusing distance play a crucial role in achieving stunning results.
In macro photography, the subject is captured at a minimum 1:1 ratio to its actual size, allowing for exquisite detail and magnification. This means that the subject appears on the camera’s sensor with the same size as it does in real life. Macro lenses, specifically designed for this purpose, enable photographers to achieve this level of magnification with precision and clarity.
It is important to note that not all photos taken with a macro lens qualify as macro photography. For true macro photography, the subject must adhere to the 1:1 ratio and be captured with exquisite detail.
| Magnification | Minimum Focusing Distance |
|---|---|
| Refers to the level of magnification achieved with the macro lens or equipment. | Refers to the closest distance at which the lens can focus on the subject for optimal magnification. |
| Higher magnification allows for capturing finer details and producing larger images. | Minimum focusing distance determines how close the lens can be to the subject to achieve sharp focus. |
Understanding magnification and minimum focusing distance is essential in macro photography as they directly impact the level of detail and quality of the final image. By utilizing the appropriate macro lens or equipment and mastering these technical aspects, photographers can explore the world of macro photography and capture astonishing images that reveal the hidden beauty of small objects.
Exploring Macro Photography Techniques
Macro photography opens up a world of possibilities for capturing intricate details and magnifying small subjects. While macro lenses are a popular choice for this genre, there are other techniques and equipment options available to enhance your macro photography capabilities. Let’s explore some of these techniques:
Extension Tubes
Extension tubes are a versatile tool for achieving greater magnification in macro photography. These tubes are inserted between the camera body and lens, effectively increasing the distance between the lens and the image sensor. By increasing the lens-to-sensor distance, extension tubes allow you to focus on subjects at closer distances, resulting in larger magnification ratios.
Macro Filters
If you’re looking to experiment with different magnification levels without investing in additional lenses, macro filters are a great option. These magnifying glass filters are screwed onto the front of your lens, allowing you to get closer to your subject while maintaining image quality. Macro filters come in various strengths, enabling you to achieve different levels of magnification depending on your creative vision.
Reversing Rings
Reversing rings provide a cost-effective way to achieve higher magnification in macro photography. These rings allow you to mount your lens backward onto the camera body, effectively turning it into a macro lens. By reversing the lens, you can capture extreme close-ups with remarkable magnification. Keep in mind that reversing rings may require manual aperture control and focusing, but they offer a budget-friendly option for exploring macro photography.
Bellows
Bellows are a flexible extension device that allows you to increase the distance between the lens and the camera body. By extending the lens-camera distance, bellows enable you to achieve higher magnification ratios and capture fine details. Bellows offer precise control over the extension length, allowing for precise adjustments to suit your desired level of magnification.
Each of these techniques has its advantages and limitations. Experimenting with different techniques can expand your creative possibilities and help you capture stunning macro images. Whether you choose extension tubes, macro filters, reversing rings, or bellows, the key is to practice and explore different approaches to find the one that best suits your vision and style.
| Technique | Advantages | Limitations |
|---|---|---|
| Extension Tubes | Increased magnification | May require manual focusing and aperture control |
| Macro Filters | Cost-effective option | May introduce image quality degradation |
| Reversing Rings | Higher magnification without additional lenses | Manual aperture control and focusing |
| Bellows | Precise control over extension length | Requires adjustment and setup |
Conclusion
Insect photography, particularly macro photography, offers a fascinating insight into the world of insects. By skillfully utilizing different macro shooting angles and mastering the fundamentals of lighting and composition, photographers can capture breathtaking and highly detailed images of these small creatures. While macro lenses are specifically designed for this genre, there are additional techniques and equipment options available that can further enhance macro photography capabilities.
Extension tubes, macro filters, reversing rings, and bellows are just some of the tools photographers can explore to achieve greater magnification and capture the hidden beauty of insects. These devices, when used correctly, can expand the creative possibilities in macro photography and provide unique perspectives on the intricate details of these creatures.
However, success in macro photography, like any other form of photography, requires practice, patience, and a keen eye for detail. By continuously honing their skills and experimenting with different techniques, photographers can uncover the captivating world of insect photography and produce stunning images that evoke awe and appreciation for these often overlooked creatures.
FAQ
What is insect photography?
Insect photography is a genre that involves capturing images of small creatures such as insects in a way that showcases their beauty and intricacy.
How does the angle of shooting impact insect photography?
The shooting angle, such as shooting down, shooting at eye level, or shooting up, can affect the composition, perspective, and overall impact of the insect photograph.
What are the challenges of shooting down on a subject?
Shooting down on a subject can present challenges such as out-of-focus antennae and distracting shadows. Finding the right combination of aperture and shutter speed is crucial for desired depth-of-field and motion detail.
How does photographing a subject at eye level create a different effect?
Photographing a subject insect at eye level creates a more intimate feeling in the image and allows for greater control over composition. However, careful positioning and composition are essential to overcome challenges with antennae issues.
What is the impact of shooting up at a subject?
Shooting up at a subject adds drama to the image, but it can be challenging as the camera’s lens needs to be positioned underneath the subject. This angle may also limit the amount of the insect’s body captured in the image.
How is macro photography defined?
Macro photography is the practice of photographing small objects in a way that renders them larger than life size. The subject needs to be captured at a minimum 1:1 ratio to its actual size.
What techniques and equipment options are available for macro photography?
Besides using a macro lens, there are other options such as extension tubes, macro filters, reversing rings, and bellows that can achieve greater magnification and enhance macro photography capabilities.
How can insect photography capture the hidden beauty of insects?
By using various macro shooting angles and understanding the principles of lighting and composition, photographers can capture stunning and detailed images of insects, revealing their hidden beauty.


