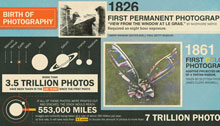
Archive for category Sites&Articles

Using High Key For Lingerie Photography (videos by smokingstrobes.com)

Hi

I found a very nice site about sexy ligerie photography tutorials, it is called smokingstrobes.com, site writer Michael Zelbel is kind of a master in using small flash units for those kind of photographs, probably the best sharing photographer in that area that I can recommend. In his site you’ll get lots, tons of info about lingerie photography in a funny and easy way, including videos, diagrams and examples

I want to inroduce you to two movies shared on his site and his YouTube channel:

First one is about photographing lingerie in your bedroom.

In this setup Michael uses only one flash and a Translucent Shoot Through White Umbrella. This setup is preaty easy and fast forward as you may see in the video bellow, Michael let you all the data to replicate this setup in your home or ourdoor shootout:

  • Camera settings: 50mm Lens, F/2.8, ISO 100, manual WB 10000k.
  • Shooting from above.
  • One flash light: 100cm Translucent Shoot Through White Umbrella and a 58GN speedlite (something like the Canon 580EX, YN560 or Nikon SB900) at 1/32 power open wide for 28mm.
  • Whenyou want to add some more lighting atmosphere to the setup, Michael added another flash to the models right setup for 1/32th power of a 43GN (like the Canon 430EXII or the popular YN460II). The flash shoot through a yellow colored bedside  lighting lamp, if you don’t have one you can just use a sunny gel filter.

Second video is all about using a high key setup for shooting those sexy photographs.

Michael used here the corridor as the location for this high key setup, you can actually use any part of your house, as you only need the white surrounding for getting the high key effect. How this is made? simple!!!

Using 3 flashes as you need a  big lighting source to paint the background with white light (used two of the here) and one flash to add the light into the model front.

Two Canon 580EX at 1/4th full power painting the background in white light zoomed wide open at 28mm.

One Canon 430EXII at 1/16th full power, zoomed at 80mm to create a good light directed to the model.

Camera: ISO 320, F/8 for a good depth , manual WB 5800K, about 2.6m from the model.

Remote control : Michael used here a sophisticated digital remote trigger , but when using manual modes for all flashes, I use normal budget triggers.

This is it, very simple, about 5 minutes videos to let you a good idea on how to shot lingerie setups!
I’ll be happy if your share that page in case you liked it.Any comments are welcomed!!!

Lytro Camera Review – Amazing!!!

Lytro camera technology!!!

This post is a really sort one! I don’t know if ant of you heard of this small camera called Lytro, the cool thing about it that not only this camera can take pictures (is it can!!!) but the crazy shit here is that you don’t have to focus the camera to the point object you want to photograph. I can’t even explain exactly how it works as I see it as a magic trick and not technology .


Here is an easy video on how it works on your dashboard after you take the image using your Lytro camera:


And here is a quick cool and funny video about how it can change your approach to photography, cool!!!

I think the focusing stuff is made by something that is like a CT Scan at the hospital, it takes during one press of a button tens or hundreds of images in many focus points, that you can choose your desired image this the desired focus point the you choose, stunning!!!

There are some examples in the links below

http://blog.lytro.com/

http://www.lytro.com/living-pictures/279

http://blog.lytro.com/category/lytros-story/

There are currently two models on PRE-ORDER status on lytro site’s, so you can’t find it yet in the stores. Some general spces:

  • For 399$ you can get the 8GB model, that will take up to 350 pictures (there will be also an 16GB model that will let you take about 750 “images”).
  • Like Apple’s gadgets it comes with internal drive so you can’t add memory the your “camera”.
  • The Lytro camera is armed with 8x optical zoom and a constant f/2 lens, that will get you plenty of exposure.
  • They don’t tell the resolution yet as I don’t think you can meter this camera by resolution when you get so much more scene here…
Here is an example what this camera can do:

What do you think about it?

PLEASE share as fast as possible

Ben Sant’s Protrait Tutorials

Hey, I wanted to share with you a very talented photographer, Ben Sant, based in the USA.

Ben has on his blog some very useful behind the scene tutorials for portrait and fashion photography using small of camera flashes, like we all love to use.

I include here two of his videos, one covering some tips on one of his winter fashion shots. en has a very unique way to explain stuff and a fresh approach to photography, so I’m pretty sure you’ll enjoy this.

On the winter set he mainly uses only one flash, trigger and a 43 inch studio umbrella (and a boom stand), this type of studio equipment is very affordable and I’m pretty sure most of you reads own this combination.

This video covers two basic concepts:

1. Underexposing the background about 1 stop for getting black and contrasted shadows.It is very important to under expose the background when photographing snow. Snow is one of the trickiest modes the camera’s light meter can face , so Ben tips us to check the images histogram while shooting so we don’t over expose the snow.

2.Lighting up the model with the main flash. Ben uses a Nikon SB-800 and a 43inch fordable umbrella on a book lightstand pointing the model from above.

Bottom line-

I really like Ben’s work and I’m pretty sure I’ll post about him in he future as he has another couple of great videos both outdoor location and indoor.

You can keep track with  Ben’s work on his video channels and blog (I’m listed to all three!)

Blog

Vimeo

YouTube

Read the rest of this entry »

Cinemagraph by Jamie Beck- A new amazing technique!

I can’t tell or explain this for myself, so first of all I’ll want you to take a look at those first couple of images (right reserved to Jamie from this blog):

Read the rest of this entry »

High Speed Photography Using Multiple flashes

Hey, haven’t been writing for the last couple of weeks as we have a new baby girl in our family, thats Naama who keeps as busy !!!

For a while I want to build myself a portable multiple flash holder, it isn’t a very hard project to do, and after the videos you’ll below I must say that you’ll do one too…

Why you need to use more that one flash?

  • In case you are shooting in daylight and the back of your scene is very bright (relatively to your photographed subject) you’ll need some flash power to correctly expose the front subject while getting the desired background. Another reason why to use multiple flashes is, to get faster recycle times.
  • If you one flash at full power’ you’ll get a slow recycle time, but if you use two flash at 1/2 power you’ll get the same flash power but significantly shorter recycle times.

So why I’m writing about that? Well I know a website for a long time, thats Dave Black’s site, Dave is a very known sports photographer and he show on his site how to use speedlights for this kind of shooting. But while I was surfing on YouTube I found out about some videos he published. I must say I was very sceptical with the first video i saw, the surfers video, he uses a gigantic 8 speedlight  holder(!!!) and photographs surfers as the flash combo is placed about 100 feet  away from the surfers, I said to my self  ”hey that’s never gonna work”… but he shows some results of his this shootout for cases where the flashes fired and when he didn’t use the flash, so I can’t argue with those  ;-) …The results are nothing but amazing!!!

Then I continued watching his other films (the motorcycles).You must watch those videos!!!
Read the rest of this entry »

Splash photography – Francesco Pappalardo

splash

As I wonder the web for inspiration , I looked for some diy ring flash on flickr.com examples, then I bomped into this guy Francesco Pappalardo who has a very active flickr gallery and I really liked one of those galleries about splash photography. The above image is just a print screen of his flickr gallery, you can browse to his gallery here : Francesco Pappalardo on flickr .

Francesco uses here a diy light box where he put the “splashy”  objects in and photographs with a basic high speed flash technique : 1/250th sec f/7.1 iso 100 and of you go!

The best image of 14 images in this gallery is :

A bit under exposed, but this on has the most interesting setup.

Thats all, it looks very simple to implement.

Recommended site : Strobox

Hey

In the previous post I wrote about a new IPhone app that I heard about, so after some searching I found out (I’m relatively new to the Apple stuff ;-) ) that there was already an app the help draw some studio lighting diagrams. The app is based on a common studio diagram web application that the most of you photographers out there already know.

strobox

So those guys created a very good community site that lets photographers share their photography and lighting setups, you’ll find there anything from fashion photography, wedding photography to food and objects photography!!!

All you have to do is to browse through the photography style categories and choose what you are interested in, then choose the type of light modifiers you want and of you go!

Enjoy!

Studio simulation for your IPhone or IPod

If you have an IPhone/IPod and interested in some studio photography and lighting, this application might be very useful.

As for the demostration of this little app, It looks very very impressive. For only 3.5& you can get a mobile studio light simulator, this is simply amazing.

So what it does?

The app allows for setups to be quickly laid out and added to the library.

A video of the app can be seen on the SLR homepage (just follow the support/homepage link).

Have fun and suggestions/ feature requests are most welcome :) .

(From iTune store).

So you could check this one for your own.

Enjoy!

Zarias.com probably the best “strobist” blog on the net

zack

I think that I visited Zack’s blog after watching a one light workshop promotion video on youtube (something funny about bumping into a cop while shooting the video), then I got really “in love” with him (although he is not my type ;-) ).

While strobist.com got much to commercial and diyphotography.net does it too , Zack’s blog remained untouched and keeps his goals with one off camera normal flash  (the strobist way 3 years ago).

If  you haven’t visited the site yet go on and do it now as its probably the best information source for beginners and pros as well!

This the best starting point to visit Zack’s site (my opinion),  its a  six part great tutorial about white seamless photography and how to use and do this very common technique, and master this quickly. Read it, even if its a little long one (take some coffee breaks ). There is lighting basics, setup basics and some easy photoshop in it, so you get almost all the info you need!

The only downside that I find here is that Zack mainly uses the big flash Westcott Apollo 28″ Light Modifier softbox
which my be a little expensive for beginners.

Visit this site and bookmark it, You’ll never regret it!!!

Tags:

Great blog by David James Williams

david_james

Well I found David’s site as I was looking for some DIY softbox ideas.I first read this post, about a way to attach small camera flash to a normal softbox (not those plastic softboxes, but a real one ). He used a sponge to hold the flash to the softbox ring, easy and simple. If you’re a DIY fun you should read that post, here is a link to that. David actually put the flash into the soft box but connects the flash to the tripod, while it holds the softbox. He experienced this with 50cm softboxes and claims to be able to hold the softbox weight. I would try to work with, or get a softbox that as a speed ring that attaches to a tripod and then add the flash sponge holder  to the softbox, so the softboxes weight won’t be on the flash.

flash sponge holder

flash sponge holder

After reading that opening post I started wondering through David’s blog and found many other posts that has great value for as photographers. You must read the Photography Tutorials section (in the categories menu), where David shares his studio photography knowledge with his reader.

It will be a good idea to subscribe to Davids blog via RSS for more useful information.

PS

David, Great site!!!

Tags: