I got an Email today from Photoflex that they launched a new site design. Why I’m sharing thi s info with you? I must confes that back then (some 5-6-7 years ago) when you started to go online for some info about photography and flashes there weren’t to much info available Continue Reading
Tips
Some things you should know about photography lighting,techniques and photography matters
Canon 5DIII Vs. Nikon D800 Video Reviews Colection
Both rivals got their new updates for their popular full frame bodies. As a Canon photographer, I use the 5DMkII, I don’t intend to buy or upgrade my 5DMkII to the newer version, I think I currently have a very powerful photography tool. If I had some spare money’ I’d Continue Reading
The Digital Holga?
Some time ago, I wanted bad to shoot some film, yes you know I was practically born into the digital era (had a Pentax “digital camera” before my first Canon G3!!!). So I played a little with some films until my son decided that the film camera is his,and I Continue Reading
Using Speedlights With a Brolly
As I might mention some posts before , my first try at more “normal” lighting diffusers, was some years back when a friend of mine (Chen, thank you!) got me a Photek Brolly from B&H, those where times where shipping wasn’t so easy to Israel and not so many alternatives for Continue Reading
RingFlash On The Budget – Part1
Hi, if you fancy a ring flash , but on the budget, this one is for you! It all started with two probably (I say probably cause I didn’t used them yet) great and very popular gadgets, those are: Ray Flash Ringflash Orbis Ring Flash Kit The only problem with Continue Reading
Panning Photography Tips – Circular Panning Trick
We had an article about panning photography a couple of month ago, you can read it here – Panning Photography. In General panning is all about capturing images while the main photographed object is in some kind of move, what kind of movement? Any type, it can be a car Continue Reading
Lighting in 3D – Guest Post
This time I want to introduce you with Matan Eshel a very talented proffesional Photographer from Israel, mainly photographing landscape,portraits and fashion photography. You can see some of his beauty work in his online gallery – Matan Eshel Photography . Matan writes here on his view on creating 3D view in Continue Reading
Two Lights Miniature Photography Home Studio Setup

As I promised in the previous post, I have some new stuff, this time I’m showing a simple setup using two lights. This setup is based on the previous one, you can read here (Dramatic Product Photography using just one light and a grid) while adding a new light to Continue Reading
Dramatic Product Photography using just one light and a grid

Hey, I remmeber a piece at McNielly about using an umbrella over your models head pointet from above just down on him.This makes a very dramatic look to the model (I didn’t found the image that I reffer to as it was on one of his DVDs – recommended) . Continue Reading
Low key photography principals
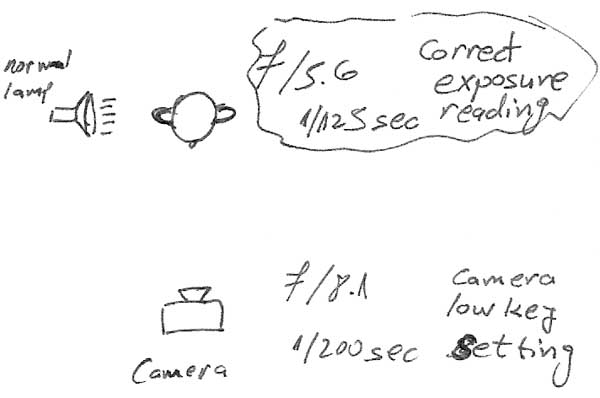
Low key lighting is what how we call the lighting method, where the photographed subject is very much described by its edges in a very contrasted way.You’ll basically need only one main=key light to get that effect, while adding a reflector might add some light into the shadows. How to Continue Reading
The easiest product photography setup ever
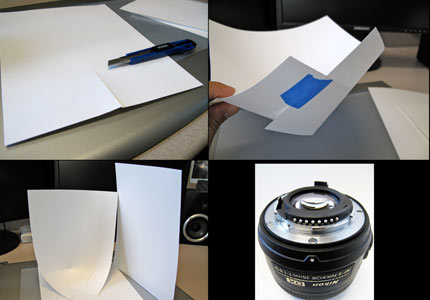
One of the most popular question on the web, when starting to learn photography is how do improve your product photography. Somehow you don’t have to own an online ebay shop in order to be interested in product photography.It simply a common task to do when you start to explore Continue Reading
Tips for better panning photographs
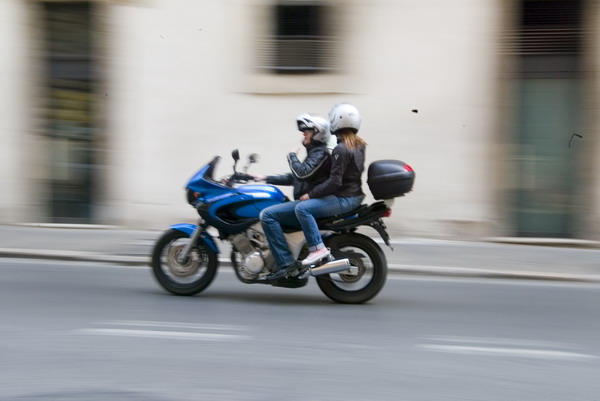
Panning is a very nice and simple photographic effect, that is very simple to implement.I’m pretty sure had some panning in your photography even if you didn’t want to.For getting the panning effect right you have to follow the basic steps that I’ll talk about in the following post, the Continue Reading
Connect your camera tripod to your umbrela
This post is for you guys that needed for some reason another umbrella, but what the heck, you don’t have another studio tripod that you can attach a swivel head that will hold the your flash and umbrella. So you are stuck? You say there must be a solution for Continue Reading
How to use an old light meter
Lately I find it very fun to shoot some films with old and not automatic film cameras. I find it a joy to use those metallic old age cameras, and the look of the developed photographs is something different from the digital cameras too. There is something about the film Continue Reading